Monday, April 27, 2020
Chromebook Tip: PowerWashing a Chromebook Without Logging In
Powerwashing a Chromebook is a means to reset it back to factory default. There are a few reasons you would want to do this. If you are getting ready to get rid of a device it would be good to do before letting it go. If you have a software error that is making the machine function improperly, you could try powerwashing it to get it running again. You might even buy a device and don't know the user account information to sign in and be able to use it. Note: If the device is enrolled by an organization, even if you powerwash it you might not be able to log back in without the organization touching the device first.
To powerwash a machine without logging in, do the following at the login screen:
Press ALT + SHIFT + R and tap the Restart button.
You will then be prompted to powerwash the device. After it finishes, you will be able to log back into your account as normal.

Friday, April 24, 2020
Zoom Meetings on Windows / Mac / Linux / Chromebook / iOS / Android / Telephone
Zoom is a popular online conferencing application to hold video/audio meetings and chat with others. It is currently being used by tons of people to stay in touch. Large companies, schools, churches, and many others are utilizing Zoom for their online communication needs.
To use Zoom, a person (usually the meeting organizer) will give you a unique 9, 10, or 11-digit number called the Meeting ID. This meeting ID is very important and is typically sent to all participants through an email that includes the date and time the meeting will take place. Along with the meeting ID, there might be a password included to join the meeting. Some meetings will require you to type the password in before you can connect and join the meeting. This is an added measure to avoid having random people join the meeting. Remember to save this meeting ID email so you have the information for the day of the meeting.
Note: When joining Zoom meetings, you will have the option to connect video and audio. By default, Zoom will try to use your built-in webcam and microphone. If you have a USB webcam or microphone plugged in, it should recognize to use that as well. If you do this, other participants will be able to see you from your webcam and hear you from your microphone. Please keep this in mind when joining and if you would like to opt out from that don't check those particular boxes when joining the meeting. For large meetings, some organizers will turn off all other webcams and mics by default so they can be the only ones broadcasting. Usually they will have a section at the end of the talk where they will enable them again so participants can comment and ask questions.
Microsoft Windows / Mac OS / Linux
When you click the email link to join the Zoom meeting on a desktop or laptop computer, you will be prompted to download and run the software. This will install the Zoom application onto your computer. When the software launches, click on the Join Meeting button. Enter the meeting ID, password (if necessary), and enter your display name. The display name will be seen by other members of the meeting, so choose a name with that in mind.


To use Zoom, a person (usually the meeting organizer) will give you a unique 9, 10, or 11-digit number called the Meeting ID. This meeting ID is very important and is typically sent to all participants through an email that includes the date and time the meeting will take place. Along with the meeting ID, there might be a password included to join the meeting. Some meetings will require you to type the password in before you can connect and join the meeting. This is an added measure to avoid having random people join the meeting. Remember to save this meeting ID email so you have the information for the day of the meeting.
Note: When joining Zoom meetings, you will have the option to connect video and audio. By default, Zoom will try to use your built-in webcam and microphone. If you have a USB webcam or microphone plugged in, it should recognize to use that as well. If you do this, other participants will be able to see you from your webcam and hear you from your microphone. Please keep this in mind when joining and if you would like to opt out from that don't check those particular boxes when joining the meeting. For large meetings, some organizers will turn off all other webcams and mics by default so they can be the only ones broadcasting. Usually they will have a section at the end of the talk where they will enable them again so participants can comment and ask questions.
Microsoft Windows / Mac OS / Linux
When you click the email link to join the Zoom meeting on a desktop or laptop computer, you will be prompted to download and run the software. This will install the Zoom application onto your computer. When the software launches, click on the Join Meeting button. Enter the meeting ID, password (if necessary), and enter your display name. The display name will be seen by other members of the meeting, so choose a name with that in mind.

Chromebook / Web Browser / Google Chrome / Safari / Mozilla Firefox / etc.
On your Chromebook or web browser, navigate to: https://join.zoom.us/
Enter Meeting ID, password (if necessary) and display name and click Join.
You might be prompted to download and run the Zoom client.
On a Chromebook, you can save time and add the Google Chrome Zoom extension from here:

Email
Open the email that the meeting organizer had sent you.
Simply click the link where it says: Join from PC, Mac, Linux, iOS, or Android:
You might be prompted to download and run the Zoom client.
Enter Meeting ID, password (if necessary) and display name and click Join.
iOS / iPhone
Download the free Zoom mobile app from the App Store.
Open the app and click on Join a Meeting.
Enter Meeting ID, password (if necessary) and display name and click Join.

Android
Download the free Zoom mobile app from the Google Play Store.
Open the app and click on Join a Meeting.
Enter Meeting ID, password (if necessary) and display name and click Join.

Regular Telephone
Dial the teleconferencing number that the meeting organizer had sent you.
Enter the meeting ID number using the phone's dial-pad.
You should now be signed into your Zoom meeting by one of the above methods. If you would need to leave the meeting there is a "Leave Meeting" button you could hit. Please let the organizer know if you have to leave for some reason.
Note: By default, Zoom will only show the active speaker of the meeting. To change this and see everyone that is in the meeting do the following:
In the upper-right hand corner click on "Gallery View." You should now see a grid view of all participants in the meeting (up to 49 people per page).
Note: Only join Zoom meetings that are sent from organizations and people that you know. Never give you any personal information in a Zoom meeting that you would not want complete strangers to hear or see.
For more information on using Zoom, I would recommend taking a look at the following links below.
Teacher Tips & Tricks for Zoom:
Zoom 101 for Teachers:
Zoom on Chrome OS:
Zoom on Android:
Zoom on iOS:
Technology for Seniors Made Easy Using Zoom:
Zoom Beginner's Guide (YouTube video):
How To: Change your Zoom Background:
Disney Zoom Backgrounds:
Zoom Virtual Backgrounds:
Thursday, April 23, 2020
Chromebook Tip: Screenshots on a Chromebook
With all the of the distance learning going on, it can be beneficial for both teachers and students to learn how to take a screenshot on their Chrome OS devices. Chrome OS includes a few shortcuts to make taking screenshots a quick process. Taking screenshots will allow students to share their screen to show off work or show the teacher an issue they are having. Teachers can also use it to show students what their work should look like or how to locate something.
Screenshot of Entire Screen:
To take a screenshot of your entire screen, hit the following keys: (Ctrl + Window Switch)

Screenshot of Selected Area:
To take a screenshot of a selected portion of your screen, hit the following keys: (Ctrl + Shift + Window Switch)

Note: A cross-hair icon will appear on your screen and you will click and drag your cursor to select the area of your screen that you would like to capture.
Where did the screenshots save to?
By default in Chrome OS, all screenshots are saved to the Downloads folder. Select the Files app and in the left pane select Downloads. You should see the screenshots you took in this folder. You can then move/email /share them as you would like.
Other Screenshot Options
Other screenshot options on Chrome OS include the following Chrome extensions that can be added to your Chrome device:
Fireshot
Lightshot
Friday, February 22, 2019
PyGame Window Demo/Setup
Hi. It's been a while since I've posted. I've been doing some coding lately and figured I'd do a quick recap for myself and you on how to do a basic PyGame program window setup.
This tutorial assumes you have already install Python and PyGame onto your machine. This is one of the most basic PyGame programs you could make and all it does is get a window setup for further coding. The code is pretty easy to follow along. You basically just initiate PyGame and then setup your window properties. Then you use PyGame to draw the window to the screen.
The code is:
This tutorial assumes you have already install Python and PyGame onto your machine. This is one of the most basic PyGame programs you could make and all it does is get a window setup for further coding. The code is pretty easy to follow along. You basically just initiate PyGame and then setup your window properties. Then you use PyGame to draw the window to the screen.
The code is:
# Michael L. Kelley Jr.# 2/20/2019# Pygame Window Demo
# Include statementsimport sys
import pygame


def Run_Game():
# Initiate pygame    pygame.init()
# Initiate pygame window
windowSurface = pygame.display.set_mode((640, 480), 0, 32)pygame.display.set_caption('Window Title Goes Here')

# Keep the window visible until quit
GameRunning = True
while GameRunning:
for event in pygame.event.get():
if event.type == pygame.QUIT:
GameRunning = False
pygame.display.flip()

Run_Game()
Thursday, December 13, 2018
How Microsoft Made Windows XP Icons
Found another neat article about how Microsoft handled making the program icons for Windows XP. Really interesting stuff for anyone that has to make icons. Check it out here:
https://msdn.microsoft.com/en-us/library/ms997636.aspx
Tuesday, December 11, 2018
Tetris
Found this really detailed article about how a computer can play the classic game Tetris. Lots of history and information in this article. If you've ever been into the game or wanted to know more about how it is made, check this out:
https://www.colinfahey.com/tetris/tetris.html
https://www.colinfahey.com/tetris/tetris.html
Friday, July 27, 2018
Music Review: D-Rail - Mr. Miyagi EP
Fresh tracks coming out of the Houston/Canonsburg area! Darrell Thomas has just released his new 5 track EP on Hollow Entertainment titled, "Mr. Miyagi" this week:

SoundCloud link to the EP here: https://soundcloud.com/d-rail724/sets/mr-miyagi-the-ep-ft-dt
He recently became a verified artist on Spotify as well:
https://open.spotify.com/artist/1llYxMO15QIcqoSAvVemno?si=SZ6wK9ZTS4WSM5eye08oAw

SoundCloud link to the EP here: https://soundcloud.com/d-rail724/sets/mr-miyagi-the-ep-ft-dt
He recently became a verified artist on Spotify as well:
https://open.spotify.com/artist/1llYxMO15QIcqoSAvVemno?si=SZ6wK9ZTS4WSM5eye08oAw
D-Rail has been a good friend of mine for a while and he's always working hard to get his music out there. This 5 track EP hits in the middle of summer and provides nice cruising music. The EP clocks in at 16 minutes and 7 seconds. The official track list is:
1. Way Back
2. Vacation (feat. DT)
3. Faster Than The Wind
4. Magic (feat. DT)
5. Time
This EP has a much more relaxed and laid back vibe to me compared to some of his other stuff like "The Last Step" mix-tape. The beats are well polished and tie in nicely together. All of the tracks flow well and the audio production is very well done. Off the EP, my two favorite tracks are Faster Than the Wind (great to drive to) and Magic.
Take a listen to Faster Than the Wind here:
(Girl catch me if you can, I'm going faster than the wind).
D-Rail is currently selling physical copies of the EP for $5. I nabbed one up yesterday and it is a pretty slick package:

To contact D-Rail and buy a copy, hit him up at the following places:
And even if you can't buy a copy right now, please follow, listen, and share his music around with others. I've noticed all the hard work he has put in and it deserves to be recognized.
'App is Damaged and Cannot Be Fixed' Mac OS High Sierra Fix
Have you downloaded a program in Mac High Sierra and noticed this error? The program refuses to open and the only option is deleting it to the trash. This happened to me and I thought my software was bad until I saw of this fix. This is actually a security setting change in High Sierra.
Once changed, under privacy and settings you will see the option appear for Allow apps downloaded from: anywhere.
This anywhere option is turned off by default, but many advanced users will want to enable this so their software can run correctly.
To enable this, open up a terminal window and run the following command:
sudo spctl —master-disable
That will enable software from anywhere to run on your Mac system and your apps should now open properly without displaying the message that they need to be trashed.
Wednesday, July 25, 2018
Google Docs Add-ons for Teachers
Just a quick video today of some neat add-ons that can be used used within Google Docs:
Thanks to Rachel Porter for creating and sharing this video.
Thanks to Rachel Porter for creating and sharing this video.
Tuesday, July 24, 2018
Find Wireless Signal Strength in Windows
Today I have a quick little tip/command to find the signal strength of a given wireless network a computer is connected to.
For this to work you will need to be running Microsoft Windows and you will need access to the command prompt.
To test the current signal strength, open up a command prompt and run the following command:
netsh wlan show interface
Note: You may have to run the command prompt as Administrator depending on your system settings.
The stats will pop up and you will want to look at the bottom portion where it says signal:
 The signal field shows the wireless strength percentage
Quick little way to double check the connection other than looking at the network bar.
For this to work you will need to be running Microsoft Windows and you will need access to the command prompt.
To test the current signal strength, open up a command prompt and run the following command:
netsh wlan show interface
Note: You may have to run the command prompt as Administrator depending on your system settings.
The stats will pop up and you will want to look at the bottom portion where it says signal:

Quick little way to double check the connection other than looking at the network bar.
Sunday, July 22, 2018
How Many Languages Do You Know?
Just a random Youtube channel I came across, but it’s very impressive. This guy has studied lots of languages and likes to catch people off guard by his knowledge.
Find the channel here:
www.youtube.com/user/laoshu505000
So, how many languages do you know? Do you use them regularly?
Thursday, July 12, 2018
Scratch Programming For Everybody
Have your children showed an interest in programming? Do they enjoy learning through technology? Have they already learned some fundamentals in school or been asking to try it at home? Summer is a great time to introduce or continue them on their programming journey!
Recently, our school has started getting children introduced to programming at the elementary level through the Code to the Future program. Children can learn many important skills through programming that can be helpful to other subjects. Here is a quick list of beneficial skills that children can acquire while practicing programming. I've been in the classrooms and have seen the great projects our students have worked on. I've always noticed the enthusiasm and teamwork of the students as they complete their projects. One programming language that the children work with here is Scratch and it is has been a big hit.

Scratch is an interactive programming environment created by MIT. The focus of the project was making programming concepts fun and easy for children to learn. This is accomplished using block-based drag and drop programming. Children learn about these concepts by moving items around the screen, waiting for mouse clicks to occur to update items, playing sound effects when certain events happen, and much much more. Children can use Scratch to make little games, animations, or even tell a story.
The Scratch programming environment looks like this:

Scratch is a great programming environment to start children on because it was built with kindergarten level children in mind. The programming environment uses images, bright colors, sounds, and animations to keep children engaged. Scratch is also very accessible. It is web-based, so no extra software needs to be installed and programs are built and ran within any web browser. This means Scratch can run on all types of hardware like desktops, laptops, Chromebooks, iPads, Android-based tablets, and even smartphones.
To get started on a new Scratch project, simply go to the web address blow:
My boss Justin has recently made some good intro Scratch videos. These could be used by both parents and children. He currently has 3 Scratch videos on his YouTube. I'll link to the first video in his Scratch tutorial video series below:
The nice thing about following along with these video tutorials is that you can go back and watch how things are done and you can follow along at your own speed by pausing the video to try the programming steps. Justin has been actively making videos and is taking suggestions for new tutorial content. If there is a concept you would like to see a tutorial made for, just hit him up on his YouTube channel and let him know! His channel can be found here:
Beyond that, some other Scratch programming resources can be found at:
Please pass this post along to anyone that is interested in learning the basics of programming. As always, if you have any questions about Scratch or if your children are working on a program and get stuck, feel free to send me a message and I'll do my best to help out.
Have a great summer of coding!
~ Michael
Thursday, May 24, 2018
Programming in C/C++ Within the Sublime Text Editor
Hi all .
In this post, I'll describe setting up a C++ environment using Sublime Text 3 and the GNU compiler. This will allow you to write code in C++ and be able to build and run it all from within the Sublime Text 3 editor.
Things you will need:
Sublime Text 3 - https://www.sublimetext.com/
MinGW -w64 - https://sourceforge.net/projects/mingw-w64/
Build system file - https://gist.githubusercontent.com/sagebind/9039773048a3900fa49a/raw/e465947afb43948b471f739992ce303a92befbf8/MinGW-w64.sublime-build
About 10-15 minutes to complete setup and test. Note: You will probably need to install under an admin account to make sure everything installs correctly.
Steps:
1. Install Sublime Text 3 onto your system.
2. Install MinGW -w64
(Note the location/folder it gets installed to)
3. Set the path variable for MinGW
Note: If you need help at this step, please see the following link and check the 'Environment Settings' section: http://www.mingw.org/wiki/Getting_Started
4. Copy the following build file and place it within Sublime Text's package folder:
https://gist.githubusercontent.com/sagebind/9039773048a3900fa49a/raw/e465947afb43948b471f739992ce303a92befbf8/MinGW-w64.sublime-build
Once the above file has been copied to a file and saved within the package folder, you can should be able to build code under Sublime Text.
Write your code in Sublime and then test by going to Tools > Build.
Enjoy!
In this post, I'll describe setting up a C++ environment using Sublime Text 3 and the GNU compiler. This will allow you to write code in C++ and be able to build and run it all from within the Sublime Text 3 editor.
Things you will need:
Sublime Text 3 - https://www.sublimetext.com/
MinGW -w64 - https://sourceforge.net/projects/mingw-w64/
Build system file - https://gist.githubusercontent.com/sagebind/9039773048a3900fa49a/raw/e465947afb43948b471f739992ce303a92befbf8/MinGW-w64.sublime-build
About 10-15 minutes to complete setup and test. Note: You will probably need to install under an admin account to make sure everything installs correctly.
Steps:
1. Install Sublime Text 3 onto your system.
2. Install MinGW -w64
(Note the location/folder it gets installed to)
3. Set the path variable for MinGW
Note: If you need help at this step, please see the following link and check the 'Environment Settings' section: http://www.mingw.org/wiki/Getting_Started
4. Copy the following build file and place it within Sublime Text's package folder:
https://gist.githubusercontent.com/sagebind/9039773048a3900fa49a/raw/e465947afb43948b471f739992ce303a92befbf8/MinGW-w64.sublime-build
Once the above file has been copied to a file and saved within the package folder, you can should be able to build code under Sublime Text.
Write your code in Sublime and then test by going to Tools > Build.
Enjoy!
Monday, April 30, 2018
Impossible To Tell if Laptop Was Hacked Article
Found this interesting article today and thought that I would share:
https://theintercept.com/2018/04/28/computer-malware-tampering/
https://theintercept.com/2018/04/28/computer-malware-tampering/
Friday, March 16, 2018
PowerPoint Saving Tricks
Just a quick 2 "tricks" when working with PowerPoint files.
1. When saving, instead of doing the usual save as .ppt...instead save your slides as a .pps. When you open this, it will go directly into presentation mode.
2. When you're going to be doing a presentation from another computer, consider saving your slides to .pdf format. This will ensure you don't run into any weird software mishaps if the computer you're presenting on has a different version of PowerPoint than the one you created the slides on.
1. When saving, instead of doing the usual save as .ppt...instead save your slides as a .pps. When you open this, it will go directly into presentation mode.
2. When you're going to be doing a presentation from another computer, consider saving your slides to .pdf format. This will ensure you don't run into any weird software mishaps if the computer you're presenting on has a different version of PowerPoint than the one you created the slides on.
Finding Inactive Computers With Powershell
Here is a quick script I ran at work yesterday to find inactive computers in our active directory. It checks the last time a system was logged on for a given amount of days specified by the user in the script.
Here's the code:
# Michael L. Kelley Jr.
# March 15, 2017
# InactiveComputers.ps1
# A script to find inactive computers via days not logged on
$DaysInactive = 90
$time = (Get-Date).Adddays(-($DaysInactive))
Get-ADComputer -Filter {lastlogontimestamp -lt $time} -Properties Name.OperatingSystem , lastlogintimestamp| Select Name.OperatingSystem,
@{N='lastlogontimestamp'; E={[DateTime]::FromFileTime($_. lastlogontimestamp)}}
Read-Host -Prompt "Press enter to exit"
Here's the code:
# Michael L. Kelley Jr.
# March 15, 2017
# InactiveComputers.ps1
# A script to find inactive computers via days not logged on
$DaysInactive = 90
$time = (Get-Date).Adddays(-($DaysInactive))
Get-ADComputer -Filter {lastlogontimestamp -lt $time} -Properties Name.OperatingSystem , lastlogintimestamp| Select Name.OperatingSystem,
@{N='lastlogontimestamp'; E={[DateTime]::FromFileTime($_. lastlogontimestamp)}}
Read-Host -Prompt "Press enter to exit"
Running this script on your AD server, will check for computers that haven't been logged on for 90 days or more. It will return the AD computer name, operating system, and time last logged on. Perfect for cleaning up active directory for systems that are no longer around. Just change the $DaysInactive variable as needed.
Monday, March 5, 2018
Ridge View Coffee
Over the weekend, I got the chance to drive up to Uniontown to meet an old college friend. Josh and I shared a lot of the same programming courses at Cal. He currently has an IT gig up that way and has recently began acquiring, roasting, and packaging coffee. At lunch he presented me with a sample of his product, Ridge View Coffee:

Ridge View Coffee is a little side project of his. This coffee gets it's start in Ethiopia and is yirgacheffe. This was the sample packet that he gave me that he had just roasted and packaged that very morning. Ridge View Coffee will also (hopefully) be used to aid in funding for his church and the many mission projects that him and his family are so passionate about.

Last night, I made a cup as it was suggested that after roasting, to wait at least a day before brewing. I opened the packet and the aroma hit me. It smelled so fresh and good:
 .
.
I just added a tiny bit of whole milk after snapping this photo and jumped in. This is good coffee. If you looked at the packaging photo above, you'll see that it has tasting notes of: blueberry, strawberry, and chocolate. I picked up on the blueberry right away and the chocolate. It was light, but packed full of flavor. It was a nice cup to have right after I had finished my dinner.
Josh is still currently streamlining his sources, processes, packaging, and marketing. When he gets his site up, I'll be sure to let everyone know. In the meantime, if you would like to reach out to Josh about buying a sample or you think his product might be a good fit in your shop, you can reach him at: ridgeviewcoffee@gmail.com and know that it would be benefiting a worthy cause.

Ridge View Coffee is a little side project of his. This coffee gets it's start in Ethiopia and is yirgacheffe. This was the sample packet that he gave me that he had just roasted and packaged that very morning. Ridge View Coffee will also (hopefully) be used to aid in funding for his church and the many mission projects that him and his family are so passionate about.

Last night, I made a cup as it was suggested that after roasting, to wait at least a day before brewing. I opened the packet and the aroma hit me. It smelled so fresh and good:
 .
. I just added a tiny bit of whole milk after snapping this photo and jumped in. This is good coffee. If you looked at the packaging photo above, you'll see that it has tasting notes of: blueberry, strawberry, and chocolate. I picked up on the blueberry right away and the chocolate. It was light, but packed full of flavor. It was a nice cup to have right after I had finished my dinner.
Josh is still currently streamlining his sources, processes, packaging, and marketing. When he gets his site up, I'll be sure to let everyone know. In the meantime, if you would like to reach out to Josh about buying a sample or you think his product might be a good fit in your shop, you can reach him at: ridgeviewcoffee@gmail.com and know that it would be benefiting a worthy cause.
Friday, March 2, 2018
Printing the HTML of a Web Page Using Python & Beautiful Soup 4
Below is some code I wrote today in Python to quickly parse in a web page and then print out the HTML found in the page.

Feel free to use/modify/share the code as needed. Was getting Beautiful Soup 4 on my new computer and doing a couple little things to make sure it is working correctly. More code to come!

Feel free to use/modify/share the code as needed. Was getting Beautiful Soup 4 on my new computer and doing a couple little things to make sure it is working correctly. More code to come!
Thursday, March 1, 2018
New Laptop Day! Lenovo IdeaPad
Hi all,
Just got a slick new laptop for work today. A Lenovo IdeaPad:
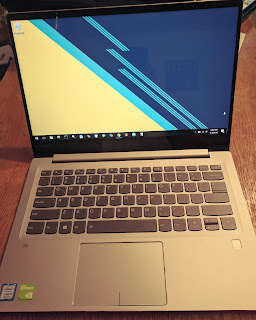
It's a pretty slick machine with the following specs:
Win 10 Pro
Intel i7 @ 1.80GHz
512GB SSD
16GB RAM
Nvidia GeForce MX150
14-inch screen
back-lit keyboard
Still getting all of my software setup, but my first impressions are good. Really liking the keyboard and the display is beautiful. Hope to be posting lots of content in 2018 so keep a look out!
~ Michael
Just got a slick new laptop for work today. A Lenovo IdeaPad:

It's a pretty slick machine with the following specs:
Win 10 Pro
Intel i7 @ 1.80GHz
512GB SSD
16GB RAM
Nvidia GeForce MX150
14-inch screen
back-lit keyboard
Still getting all of my software setup, but my first impressions are good. Really liking the keyboard and the display is beautiful. Hope to be posting lots of content in 2018 so keep a look out!
~ Michael
Thursday, November 9, 2017
Silly YouTube Tricks
I've got a few silly tricks to share when using YouTube.
The 1st is 'Quiet YouTube.'
First, find the video you want to watch in quiet mode. Then in the address bar, put quiet in front of youtube.com.
Example: http://www.quietyoutube.com/watch?xkjfdfkdf
Then hit enter and this will take you to a "quiet" page of the video you want. There will be no advertisements to other videos on the side. Great for classroom environments.
The 2nd silly trick is 'copy URL at current time.'
Say you want to share a video with somehow to show them a specific part in the clip. There would be two options really....give them the time they should jump to or make them watch the entire clip. With copy URL at current time, we can skip doing both of those.
To do this, got the time spot in the video you want and pause the video at that time. Go gown to the red bar and highlight over the red line with your cursor on the time you would like to start with. Then right-click and chose copy video URL at current time.
Now you can share this link or put it online and whoever watches it will see the video start at the exact moment you picked. Nice!
Those were just a couple quick silly YouTube tricks. I picked them up at a Google educator training this week and wanted to jot them down here for notes and to help other people as well. Hope everyone has been doing well!
~Michael
The 1st is 'Quiet YouTube.'
First, find the video you want to watch in quiet mode. Then in the address bar, put quiet in front of youtube.com.
Example: http://www.quietyoutube.com/watch?xkjfdfkdf
Then hit enter and this will take you to a "quiet" page of the video you want. There will be no advertisements to other videos on the side. Great for classroom environments.
The 2nd silly trick is 'copy URL at current time.'
Say you want to share a video with somehow to show them a specific part in the clip. There would be two options really....give them the time they should jump to or make them watch the entire clip. With copy URL at current time, we can skip doing both of those.
To do this, got the time spot in the video you want and pause the video at that time. Go gown to the red bar and highlight over the red line with your cursor on the time you would like to start with. Then right-click and chose copy video URL at current time.
Now you can share this link or put it online and whoever watches it will see the video start at the exact moment you picked. Nice!
Those were just a couple quick silly YouTube tricks. I picked them up at a Google educator training this week and wanted to jot them down here for notes and to help other people as well. Hope everyone has been doing well!
~Michael
Subscribe to:
Posts (Atom)